Monday, January 30, 2012

CHEAT DAY: Cupcakes for Two with Cream Cheese Frosting

THIS IS MY FAVORITE THING EVER.

Two cupcakes.

Just two (2).

You don't have to worry about leftover cupcakes tempting you all week. Just one night of cupcake.

I'm a huge cake fiend, if you can't tell.

LOW CARB AND GLUTEN FREE OPTION AT THE BOTTOM

Ingredients:

1 whole egg
2 T. sugar
2 T. butter, melted
1 t. vanilla
1/4 cup all-purpose flour
1/4 heaping t. baking powder
A pinch of salt
1 1/2 T. milk

Instructions:

In a small bowl, combine egg and sugar.


Add melted butter (my advice is to let the butter cool a little so your egg doesn't cook while you do this). Combine.


Add the vanilla. You guessed it. Combine.

Add flour, baking powder, and salt. You get it now. Combine.


Add milk! Yay, combine again!

Pour into a greased and floured (or lined) cupcake tin. Bake at 350F for 10-16 minutes (mine take around 15-16, original recipe stated 10-12 minutes), or until a toothpick inserted in the center comes out clean.


Make the frosting while they cool completely!

Frosting:

1/4 cup (2 oz) cream cheese, room temperature
2 T. butter, room temperature
1 cup confectioner's/icing sugar

Combine (there's that word again!) cream cheese and butter until smooth.

Add sugar until frosting has reached the desired sweetness and/or texture. Ice them cupcakes.

TWO CUPCAKES!!!!

Have fun with flavoring the cupcakes. Play around with the recipe.

I have made this low-carb and gluten-free by using almond flour and yogurt instead of flour and milk. Yogurt REALLY helps with the almond flour. Use powdered Splenda for the icing.

Saturday, January 28, 2012

CHEAT DAY: Pasta with Salmon and Broccoli in a Lemon Cream Sauce

WARNING: This recipe is in no way low-carb. It was tonight's Cheat Day dinner.

Ingredients:

1 small salmon filet, chopped into bite-sized pieces
About 1 cup of broccoli florets (optional)
2 T. butter
1 T. flour
1/3-1/2 cup of cream
Zest and juice of 1/2 a lemon
1 T. capers, drained
Salt & pepper to taste
Parmesan cheese for garnish

Instructions:

Cook pasta according to package instructions. Drain/rinse and set aside.

Melt 1 T. butter in a pan over medium heat.


Add broccoli and saute until almost cooked through (I like mine crunchy). Remove from pan (I didn't do that, but my broccoli ended up overcooked, so I advise doing this).


Melt 1 T. butter in the same pan over medium heat. Add 1 T. flour and stir together to form a roux. Allow the roux to become foamy. Add the cream in a steady stream, stirring until incorporated. Bring to a simmer and allow to thicken. Add more cream if desired.


Add the lemon juice, zest, and capers. Allow to cook for 1-2 minutes.

Add salmon. Cook on all sides in the simmering sauce until nearly cooked through. Season the sauce to taste with salt and pepper.


Toss the pasta and broccoli in the pan with the sauce, and serve garnished with parmesan cheese!


Delicious! But I only ate about half to save room for dessert. I also think that if you wanted this to be low-carb, you could serve the salmon with the sauce, just reduce the quantity.

Lazy Saturday Post: Your Diet and Cheat Day

I've wanted to make a post about this since starting up the blog, and today seems as good of a day as any to do it!

First, the word "diet". It is often seen as something temporary and utterly horrible to go through. Really, though, your diet consists of everything you put into your body. It does not have to be something you do once or twice a year to slim down for the beach or those special occasions. Starving yourself for a few weeks and eating things you don't enjoy just to quickly lose 10 pounds basically guarantees two things, in my opinion: a bad relationship with/understanding of food, and weight re-gain. And no one wants that.

Our low-carb diet is a permanent one. The goal is long-term, not short term. I can eat tasty food, I just choose to eat the right tasty foods that help me to be my healthiest self. There are no tricks, other than avoiding sugars and other carbohydrates. It works for me and my body. I feel good, I eat VERY well, and I don't really feel like I'm missing out on too much.

Until I get the cravings.

Now, I don't think any diet should completely remove any sort of food group. This also, generally, guarantees failure in any attempted diet. We need all the food groups in our diet. We need sugar, we need fat, we need protein. It's the ratio that needs to be shifted, not any one of these eliminated. You notice, on low-carb, you still eat carb-containing foods, just not the ones that deliver a quick sugar rush to the body. Because we need them!

And sometimes our bodies think they need sugar. Because we evolved to want sugar and salt and fat and all the things that are far too easy for us to eat these days.

SO. We have "Cheat Day". Cheat Day is the day, once a week, when we are allowed to eat whatever we want, whenever we want, and how much we want. Perhaps this could be once every few weeks for you, or once a month. We do it once a week.

You will not regain the weight you have lost with one day of bad eating (you might bloat up for a day or two, but meh). You WILL get rid of any of the cravings you have. And, over time, you will find that you don't even want to indulge in much "bad" food on Cheat Day, because your body begins to realize, "Oh, hey, this doesn't really make me feel good OR full!" BUT you're allowing yourself the option of having whatever you have craved, and preventing any downfalls during the rest of the time.

So, enjoy those things you want every once in a while, and don't beat yourself up about it!

Today is my Cheat Day (every Saturday). I had a big huge breakfast with toast and hashbrowns (usually, we have pancakes or waffles, but we're out of maple syrup), I had some soup for lunch (I never feel like having much lunch on Cheat Day, hehe), a big ol' chocolate truffle, and tonight I'm making myself a nice pasta dish. As much as I'm craving burgers and fries, I know I'll enjoy the pasta more :). And then, beverages! Yay!

I have no idea if this post is super-coherent. I'm starting to discover that I'm not a great blog writer.

Tuesday, January 24, 2012

Mattar "Paneer"

...but really, it's tofu.

I will also call this dish, "HOLY PEAS, BATMAN!"

I love Indian food. Love, love, love it. I could eat Southeast Asian food (Indian, Thai, Vietnamese, and I'm sure anything else from the region) for the rest of my life and be completely contented. Okay, so I'd need a healthy helping of Japanese too. Can't miss out on my sushi.

Anyway, I don't cook it a lot because Charles "doesn't care for it". Which, for him, means he'll eat it, but he won't pick it out himself. So, I save it for when I'm alone or when there's a special request from a guest.

Also, I don't always eat tofu, but on the occasion, it's money-saving ($2 for 16 oz. of it) and healthy.

Paneer is an Indian cheese (much like cottage cheese in flavor...maybe more like feta in texture), but this recipe uses tofu instead as a healthier option, which I liked. You get a similar texture and less calories! Hooray!

Now, this is a stir-fry. Not in the, "OH GOD I HAVE 5 SECONDS TO THROW EACH INGREDIENT IN BEFORE THE NEXT!" like all the Thai dishes I cook, but in the you-can't-walk-away-while-it's-cooking sense. Be ready. Have all the ingredients measured, easily accessible, and ready to go.

Ingredients:

3-4 T. neutral-tasting oil (vegetable, canola)
16 oz. firm or extra-firm tofu, cut into 1/2-inch cubes
1/2 t. salt

1-2 T. oil (if needed)
1 onion, chopped
1/2 t. ground turmeric
1 t. garam masala
3-5 Indian finger hot peppers, stem ends removed
3-5 red Thai bird chilis, stem ends removed (adjust the chilis to your heat preference)
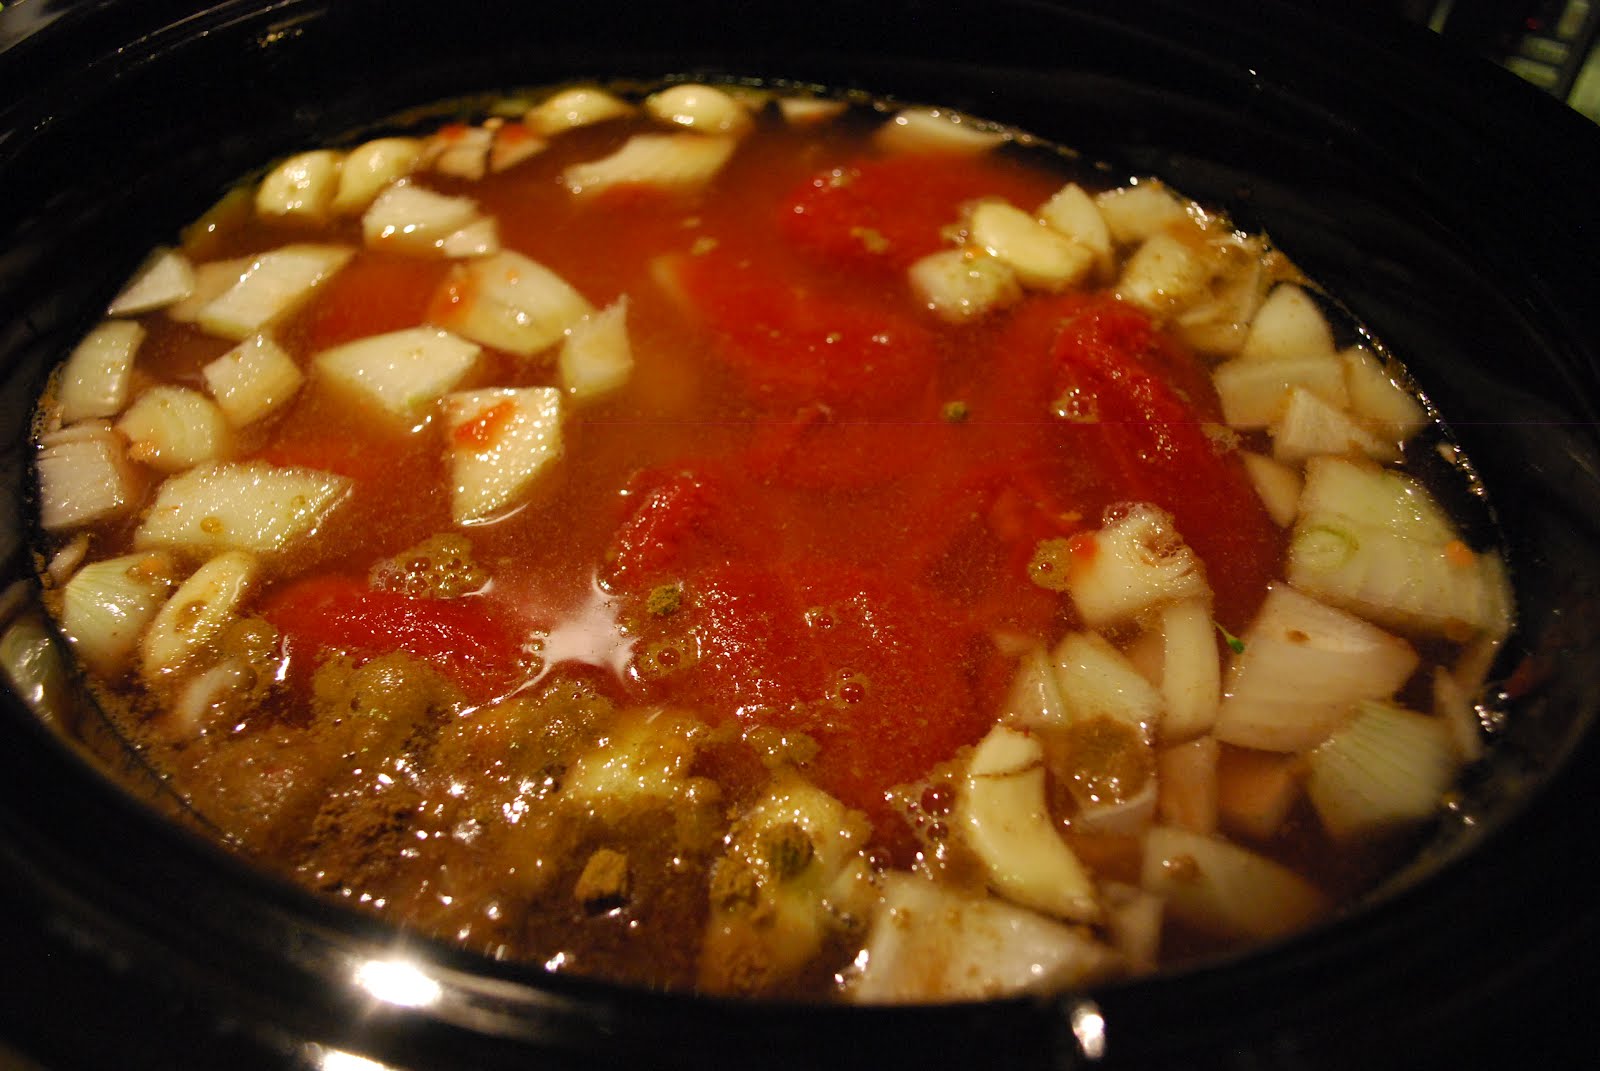
3/4 cup canned whole, peeled tomatoes, drained and chopped
1/2 cup of plain yogurt

1 T. oil (again, neutral)
1 1/2 T. ginger-garlic paste (process an equal amount of garlic & ginger in a food processor if you can't find any at the store)
1 1/2 t. granulated sugar
3/4 t. red chili powder (I used cayenne, 'cause I had it)
2 16 oz. packages of frozen peas (NOTE: I thought this was way too much. I had almost no sauce to eat. Use to your discretion.)
Salt & pepper to taste
2 T. plain yogurt or sour cream

Instructions:

Heat 4 T. oil in a wok over medium-high heat (more on the high end). When hot, fry the cubed tofu in the wok until pieces are golden brown on all sides. This will take 5-10 minutes.


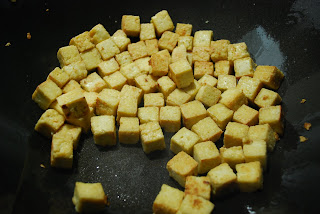
When done, place tofu on paper towels to soak up oil, and sprinkle with 1/2 t. salt.

If needed, add 1-2 more T. of oil (I didn't have any left because I didn't wait long enough originally for my oil to heat, so it soaked into the tofu) over medium-high heat (more in the middle this time). Stir-fry the chopped onion until it is translucent and a golden brown color (not burnt!). Add spices and chilis, and stir-fry for 1-2 minutes over medium heat, stirring frequently (my wok was quite dry at this point). Turn the heat up to medium-high again, add tomatoes and yogurt, and allow to simmer for about 5 minutes, stirring frequently.


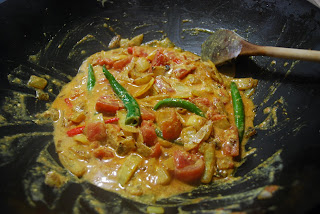
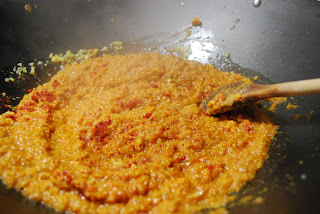
Once done, remove the chilis and set aside. Pour the masala sauce into a food processor or blender, and pulse until smooth. Add 1-2 T. water if the mixture is too thick.

Pause time! Clean out your wok and dry it!

Heat the last tablespoon of oil in the wok over medium-high heat. Add garlic-ginger paste and stir-fry until fragrant (this usually takes about 1 minute for me--don't let it burn!). Add the pureed masala sauce, the sugar, and the red chili powder into the wok.


Add 1/2 cup of water (or more, up to 1 cup). Bring to a simmer and cook for 1-2 minutes, stirring frequently. Add your frozen peas (REMEMBER, ADJUST FOR YOUR TASTES). Allow the peas to cook, and simmer the sauce (stirring often, of course) until the liquid has almost completely cooked off. Once the sauce has reached its desired thickness, add in the fried tofu and reserved chilis, and simmer for another 5 minutes over medium heat. Stir in 2 T. of yogurt or sour cream.

SEE? DO YOU SEE ALL THE PEAS?!

Serve hot, plain or with your choice of basmati rice, naan, or roti (if you're not low-carb, of course).

*********

SOME NOTES:

DO NOT USE OLIVE OIL IN A STIR-FRY.
Olive oil has too high of a smoking point and will lead to you very easily burning your food!

Adjusting the heat during a stir-fry is something I've learned to do with experience. Something seems like it's not cooking fast enough? Turn up the heat. It's cooking too fast and burning? Turn it down and hold the pan off the heat for a minute or so. Be on top of it!

Indian finger hot peppers are about the equivalent on the Scoville scale of a jalapeno. I had them in my freezer and wanted to use them. The original recipe called for green Thai bird chilis and dried red chilis, but I changed it up and it was still hot and tasty.

If you don't want to wash out your wok in the middle of cooking, use another (large) pan.

This has the potential to be vegan, which is why I labeled it so. Just sub in soy yogurt and/or cream.

**********

Hope you all enjoy!

Monday, January 23, 2012

Ful Medames

I watch a lot of No Reservations, and in Tony's Egypt episode, he ate this awesome street food breakfast that sounds like "fool". It looked delicious--a reddish bean-y mixture topped with a fried or hard-boiled egg, scooped up with lots of pita bread and eaten by, according to Tony, a large part of the Egyptian population every morning. Hearty, healthy, filling, and tasty.

So I set out to find I recipe, and I think I found a good one after looking through recipe after recipe (and alternate spelling after alternate spelling). Do I know if it's super-authentic? No, I've never had real ful, but it was really tasty.

To compare it to anything else, it feels like having refried beans for breakfast, but no lard and way better. This dish probably, seriously, has at least half of your day's worth of fiber in it. This is why beans and lentils are allowed on low-carb, haha.

Ingredients:

1 pound dried, peeled fava beans (also called broan beans--try to find small ones, these are most authentic)
1/2 cup red lentils
1/2 large onion, chopped
1 cup tomato, chopped
3-4 cloves of garlic
1 t. ground cumin
Salt to taste
2-3 T. lemon juice

For garnish: olive oil, butter, a fried or hard-boiled egg, or scallions

Instructions:

Soak your dried beans for 8-10 hours. If you want to have ful the next morning for breakfast, do this 24 hours before. This is where my recipe went wrong--my store didn't have dried fava beans (no matter how hard I looked, they never appeared!), so I had to buy canned ones, and this led to watery ful that I had to cook down. Basically place the dried beans in a pot, cover with water an inch or two above the beans, cover the pot, and let sit.

These are my dumb canned beans. They are large and not authentic, but I had no other option at my store.


After the beans have soaked, place beans, lentils, onion, tomato, garic, and cumin in a slow-cooker and cover over with water 2 inches above the beans (If you use canned beans like me, do not add so much water!). Cover the slow-cooker. Cook on low for 10 hours overnight.


In the morning, most of the water should be gone. Stir in 2-3 T. of lemon juice, and mash the mixture with a potato masher. It should be the consistency of refried beans (I didn't know, so I'm telling you). Excuse my different pot--I had to transfer all of mine to the stove to cook off the extra water.


Place in a shallow bowl and top with your garnish of choice! Eat with pita bread if you are not following low-carb.


Being the heat freak I am, I put in a hearty teaspoon of sambal oelek, and could have added more.


I waited ALL morning for this and it was so worth it. I would have eaten more if it weren't so late in the morning when it was finally cooked down.

Saturday, January 21, 2012

I apologize for my lack of recipe posts! When Charles is away, I don't find myself cooking a lot, so I essentially make huge amounts of food and eat leftovers all week. I did make a mock-BBQ-pulled-pork, but I found my low-carb BBQ sauce unremarkable and not worth posting. When I perfect it, it'll definitely be added. I just don't want people to make the recipe and be disappointed :).

Be looking out for some great low-carb international recipes coming soon! I'll be tackling Ful Medames (an Egyptian breakfast dish) and Tofu Paneer Mattar (an Indian tofu dish). Yum yum!

Wednesday, January 18, 2012

Sweet & Sour Cabbage, Beet, and Tomato Borscht

So, I made this soup today for lunch, and didn't entirely expect too much from it. But, holy tasty, Batman! So I decided to share it all with you.

But first, a short discussion. Carrots and beets are higher on the glycemic index scale because they contain higher amounts of natural sugars. One would think, oh, I cannot eat these things on a low-carb diet. But today, while trying to find out the glycemic index of beets, I discovered "glycemic load". This is, in my terms, like "net carbs"--the amount of carbs minus the soluble fiber in a food, leading to a lower carb count. The glycemic load of beets and carrots is actually fairly low, since they have a LOT of fiber in them. So, guess what? They're fine!

Now, on with the soup.

Ingredients:

1 onion, chopped
1 carrot, chopped
4 raw beets, diced
1 small head of cabbage (I had 1/4 of a GIANT head of Savoy cabbage, and it was plenty)
4 cups of vegetable or chicken broth
2 cups of water
14 oz. can of peeled, whole tomatoes
1-2 beets, grated coarsely
2 T. dried dill
Salt & pepper to taste
3 T. of sugar (or sugar substitute, which I used)
3 T. cider vinegar
1 t. half-sharp paprika

Instructions:

Place onion, carrot, diced beets, cabbage, tomatoes, broth, and water in a large pan and bring to a simmer. Simmer for 30 minutes, or until beets are tender.

Add in grated beet(s), dill, salt & pepper, paprika, sugar, and vinegar. Taste soup and make sure the seasoning are right and adjust the sugar/vinegar to your "sweet & sour" tastes. I used more vinegar, as I like sour things.

Allow soup to simmer for 10 more minutes.

Serve hot, with a dollop of sour cream. This can also be served cold, but I can't stand cold soup, so I had it hot!


Excuse my sad picture. I took it with my phone, since my camera is still dumb and missing.

Also, be warned, watch the splatter of this soup--it will stain EVERYTHING.

FYI, according to the book I adapted this recipe from, the calorie count for one serving of soup (this makes "6 servings") is around 111 calories. The original recipe had potatoes in it as well, so this is a very filling but low calorie soup. Yay!

UPDATE NOTE: Just an FYI, I don't recommend making this with beef broth. I did this week, and the beef flavor just takes over everything and makes it far too savory. With chicken broth, there's a nice sweetness to it from the beets.

Tuesday, January 17, 2012

Meatballs in Marinara Sauce with Fake-Out "Spaghetti"

Annnd, we're back. Charles is in London for work (many sad faces :( ), the busy time of cleaning, and laundering, and packing is over, and I have endless free time on my hands (never a good thing :P). Pictures will be posted once I locate my dumb camera.

Today's recipe! : Meatballs in a Marinara Sauce with Fake-Out "Spaghetti"

This is adapted from a marinara-meatball recipe I've been using for quite a while that always comes out AMAZING. P.S. It's even better leftover.

Also, marinara is just delicious.

Ingredients:

Meatballs:
1 lb. lean ground beef (or pork, or a mixture, if you prefer it)
1 cup parmesan cheese, finely grated
1/2 cup flax seed meal
1 egg
1/2 t. garlic powder
Salt & pepper to taste

Sauce:
2 T. olive oil
1 large onion, chopped
5 cloves of garlic, minced
2 28-ounce cans of whole, peeled tomatoes (San Marzanos are THE BEST for this)
1/4 packed cup of fresh basil leaves (at least)
Salt & pepper to taste

Instructions:

Heat 2 T. olive oil in a large sauce pan over medium heat. Sautee onion until translucent and cooked through. Add garlic and sautee until fragrant.


Add tomatoes and bring to a simmer. Allow to simmer (not boil--you will have sauce EVERYWHERE if it boils), covered, for 30 minutes (or more).


While the sauce is simmering, combine meatball ingredients in a medium bowl. Set in the fridge until chilled.

After the sauce has simmered, roll the meatball mixture into 1-inch diameter balls (this is easier after the mixture has chilled) and add into the pot of sauce. Once all the meat mixture has been added, allow the sauce and meatballs to simmer for 30 more minutes, uncovered. Make sure to gently stir occasionally so all meatballs are equally covered by sauce.


Add the fresh basil at the end of the cooking process, about 10 minutes before serving.

Fake-Out Spaghetti!

Ingredients:

2 T. olive oil
3 medium zucchini
Salt & pepper to taste

Time to test out your knife skills! Cut off the ends of the zucchini and julienne the squash lengthwise.


Heat olive oil in a saucepan over medium-high heat. Add zucchini and cook in batches until tender (and spaghetti-like). Salt and pepper lightly, and serve. Cover in meatball and sauce mixture. Top with parmesan cheese! Yum yum!

Friday, January 13, 2012

Lemon-Parmesan Broccoli and Simple Veggie-Chicken Soup

Posting two recipes today because it's Friday, and we have a busy weekend coming up because Charles is getting ready to head to London for three weeks for work. Also, by now, we have enough leftovers in the fridge to survive the weekend without really cooking! :D Hope everyone is having a good Friday the 13th! Keep on cookin'!

The broccoli with the chicken dish is quite simple and no-hassle. Really fresh and tasty, too!

Ingredients:

2 heads of broccoli, florets trimmed off at about the 2 inch mark (I always include some stem because it's good for you!)
2 T. olive oil
2 cloves of garlic, minced
Zest of 1/2 a lemon
Juice of 1/2 a lemon
1/4-1/2 cup parmesan cheese, finely grated (to your tastes)
Salt & pepper to taste

Instructions:

Place 1 T. olive oil in the bottom of a baking dish to coat.

Place broccoli florets, garlic, zest, and salt & pepper into the dish. Toss together.

Squeeze 1/2 lemon over broccoli.

Top with cheese.

Bake at 350 F for 25-30 minutes, or until the broccoli stems are tender when pierced with a fork.

Now, the soup was something I made for Charles because he had a cold and I always think chicken noodle soup is soothing. But, being on low carb, no noodles allowed! So I tossed something together that had the basic ingredients of chicken noodle, but with more veggies.

Ingredients:

2 T. olive oil
1 large onion, quartered and thinly sliced
3 medium carrots, diced
2 stalks celery, diced
2-3 cups of any greens/veggies you like/have on hand (I had a frozen "edamame blend" that has broccoli, green beans, edamame, asparagus, and spinach)
1 T. dried thyme
1 T. dried rosemary, crushed
2 bay leaves
6 cups of chicken stock/broth
4 cups of water
Salt & pepper to taste

Instructions:

Heat olive oil in a large soup pot over medium heat. Sautee onions, carrot, and celery until the onions are translucent and the carrots are slightly tender.


Add greens and spices/herbs and cook until almost tender/cooked (this will vary depending on what you use).


Add broth and water and bring to a simmer (excuse my block of broth; it was homemade and frozen). Simmer for 30 minutes, or until time to serve. Season with salt & pepper to taste.


Serve hot! I garnished mine with a poached egg, as I wanted some protein :).

It's nothing super special, but it's good for you and comforting when you're sick.

Thursday, January 12, 2012

Sun-Dried Tomato Pesto and Goat Cheese Stuffed Chicken

So, one of my cats may be sick, and I'm trying to distract myself until the vet appointment by posting.

This is one of Charles' latest favorites of all the low-carb chicken dishes I've made. It's REALLY tasty, super easy, and it disappears really fast! Adapted from Kalyn's recipe, as usual.

Ingredients:

3 boneless and skinless chicken breasts
1/3 cup sun-dried tomato pesto
1/3 cup soft goat cheese
3/4 cup parmesan cheese, finely grated
Salt & pepper to taste

Instructions:

Preheat your oven to 350 F. Lightly oil a rectangular baking dish big enough to hold the chicken breasts side by side.

Mix together sun-dried tomato pesto and goat cheese in a small bowl, until well-blended.


Using a meat mallet, flatten chicken breasts until they are about 1/4 inch thick. I do this in a sealed plastic bag as to not have chicken spray everywhere.


In a shallow dish (I use a pie dish), mix together grated parmesan, salt, and pepper. Lay a flattened chicken breast in the dish, press down to coat with parmesan, and fill with 1/3 of the pesto-cheese mixture.


Roll the chicken around the pesto mixture and secure with toothpicks (I tend to roll mine like tacos). Place in baking dish and repeat with other chicken breasts. I also tend to dump any leftover parmesan from the shallow dish on top of the chicken once I'm done coating/filling.


Bake at 350 F for 40-50 minutes, until the chicken is firm (but not HARD) and cooked through. Sometimes I turn up the heat to 375 F in the last 10 minutes to get a nice browned top on the chicken, but that's not necessary. Serve hot!


P.S. Please excuse the poor lighting in my photos. I am not a photographer, and it's pretty darn dark here in Canada by dinnertime, so they pictures are shot under cruddy indoor lighting :P.

Wednesday, January 11, 2012

Kalyn's Hungarian Pot Roast with Sour Cream & Paprika Gravy

I followed Kalyn's recipe nearly exactly for this recipe, only adding in 8 oz. of sliced mushrooms (they were in my fridge and getting ready to go bad). It's essentially goulash, but pot roast style. Pretty tasty, though next time I might throw in more salt or something to up the umami flavor.

Ingredients:

2 T olive oil
1 rump roast, about 2.5 pounds (I had a blade/chuck roast, which also works)
generous amount of steak seasoning (about 1 T) to rub on roast before browning (or salt & pepper)
4 large yellow onions, cut into slices at least 1/2 inch thick
2 T sweet Hungarian or Spanish paprika (I used more)
1/2 tsp. sharp Hungarian paprika or smoked Spanish paprika (good because it gives it a kick. I used more.)
1 jar (12 oz.) roasted red bell peppers (I used freshly roasted ones from the last post)
1 can (14.5 oz.) diced tomatoes with juice
2 cups homemade beef stock or low-sodium beef broth
fresh ground black pepper to taste
1 1/2 cups sour cream

Instructions:

Heat 1 T. olive oil in a sauce pan over medium-high heat. Rub the meat with the steak seasoning and brown well on all sides. This should take about 10 minutes.


Place the meat in the bottom of a slow-cooker.

Heat 1 T. olive oil again, over medium heat, in the same pan. Add onions and paprika(s) and allow to soften and brown (not burn! Mine did a little).


Place onions on top of and around the browned roast in the slow-cooker.

Slice roasted red peppers into 1/2 inch pieces, and place peppers and tomatoes in the crockpot (this is also when I added the sliced mushrooms, raw).


Place 2 cups of beef stock/broth in the same sauce pan as before and reduce until 1 cup remains. Add to the crock pot, and season with salt and pepper.

Cook roast on high, covered, for 4-6 hours, until the roast feels tender when pierced with a fork. Place the roast on a plate. Using a stainer, strain the liquid from the vegetables (KEEP THE VEGETABLES).

Place the liquid in a medium saucepan and, over medium-high heat, reduce the gravy by half. Using a whisk, add small amounts of sour cream gradually and mix until well-blended.

Place the meat and vegetables back into the slow-cooker.

Pour the gravy over it. Cook on high for another 20-30 minutes, or until everything is reheated.

Serve alone, or over brown rice or whole wheat noodles (for lower carb content--egg noodles if you're not following low-carb) and enjoy!


We had it alone, and I wished that there was something to mop up the gravy with. Next time I make it, I'll make a pureed cauliflower "mashed potato" substitute and see how that works out.

Sunday, January 8, 2012

Basics: Roasting Bell Peppers

Roasted red peppers are a delicious addition to many meals, and a lot of recipes I find call for them jarred. Unless you're buying the $6 gigantic jar at Costco, I think you're better off spending the time to make your own. My local grocery store sells only small jars of them for about the same price, and it only includes maybe 1 1/2 actual peppers.

So, today, your basic instruction of roasting your own red peppers at home for less cost and more yummy!

Preheat your oven to BROIL on high and move the oven rack to the highest place in the oven (about 4-6 inches from the heat source).

First, take some delectable red bell peppers (or orange, or yellow, or green, whatever your recipe calls for).


Using a paring knife, remove the stem, seeds, and membrane.


Put aluminum foil on a cookie sheet, and using about 1 T. of olive oil, grease the foil. Place the peppers cut-side down on the cookie sheet and drizzle oil over them, coating them well (I use my Misto oil mister).

Place in the oven and allow to broil for 20-25 minutes, until the tops are well charred. You may smell burning, but don't worry, they're supposed to do that.

When the peppers are charred,

remove them from the oven and place them in a bowl or shallow dish. Cover them with plastic wrap/cellophane/Cling Wrap and allow them to sit at room temperature for at least 20 minutes, or until cool enough to handle.


Using your fingers, you can now easily peel off the charred skin of the peppers, and you will have perfectly roasted peppers!


This method can also be used for any variety of pepper, just adjust the broiling time depending on their size.

Saturday, January 7, 2012

Low(er) Carb Chocolate Chip Banana Bread with Walnuts (and How to Make Your Own Almond Flour)

I love banana bread. It has been a staple in my house since I was a small, small child and I hate going without it. I also have a big sweet tooth when it comes to cookies and cake (banana bread falls under cake in my mind). When we went low-carb, I thought, "How? How will I get my precious banana bread? How will I have my delicious desserts?"

Then I discovered almond flour through this lovely website. But, alas, I wanted to use my banana bread recipe that everyone raved about. So what did I do?

Through trial and error (so many errors), I finally have a low(er) carb banana bread that I can rave about. And I am sharing it with you.

Ingredients:

2 cups almond flour
¼ cup ground flax seed
¼ cup all-purpose flour
1 t. baking soda
1 t. baking powder
½ t. salt
1 t. ground cinnamon
1 cup Splenda (or substitute sugar of your choice—just make sure it’s equal to 1 cup sugar)
½ cup cooking oil
2 large eggs
¼ cup Greek yogurt
1 t. vanilla extract
3 overripe bananas, mashed
½ cup walnuts, chopped
1 cup semi-sweet chocolate chips (optional, but delicious)
1/3 cup walnuts, chopped
A small handful of rolled oats

Instructions:

Preheat oven to 350 degrees F (approx. 175 degrees C). Butter and flour a bread loaf pan.

Combine almond flour, flax seed, all-purpose flour, baking soda, baking powder, salt, and cinnamon in a small bowl. Set aside.


Using a hand mixer, combine the oil, Splenda, and 2 eggs in a large bowl until the mixture is pale and frothy. Add ½ of the dry ingredient mixture to the bowl, mixing well. Add the Greek yogurt and vanilla extract. Mix well. Add the rest of the dry mixture, and mix again. Your batter will probably be quite thick.

Mix in the mashed bananas.


Stir in ½ cup chopped walnuts and chocolate chips.


Pour batter into the prepared loaf pan. Top with remaining 1/3 cup of chopped walnuts and handful of oats. Lightly press the topping into the batter (this will prevent it from not sticking).

Bake in the preheated oven for 1 hr. to 1 hr. 15 minutes, or whenever a toothpick inserted in the center comes out clean.


Notes:

You CAN make this gluten free (and lower carb) by using entirely almond flour, but be aware that it will not be as fluffy as using the ¼ cup of flour. It tastes perfectly fine, but it falls a bit flat and has a more moist texture. This is my final recipe after much trial and error, and the yogurt seems to help the bread hold a more cake-y texture (before, I tried using milk, buttermilk, etc).

If you want to go even lower in carbs, I suggest using the darkest chocolate chips you can find (or eliminating them completely) and substituting more walnuts (they help hold the bread’s structure).

Almond Flour

Now, almond flour is often readily available at your local supermarket (I often find it in the gluten free section) or your local health food shop. Unfortunately, it's very expensive for a small amount of flour--where I live, it's about $12 for approx. 3 cups of almond flour. I can easily go out and buy a 2 pound bag of almonds for $20 and have far more almond flour for my disposal.

What you'll need:

A food processor
Almonds (whether raw or blanched is your preference)
Patience

Place the almonds in batches into the food processor. Mine is tiny, so I do my almond flour about 1/2 cup at a time.

I first use the "Chop" setting and pulse it until the almonds are entirely chopped. Then I grind.

Pulse the almonds until you start to see a layer of almond meal building up at the bottom of the processor like this:

That's almost almond butter! This tells you that the flour is getting very finely ground.

Stir it up (I use a whisk or a fork), put into a container and save it for your baking. Ta-daaa, almond flour!

If you want to get REALLY technical about it and get your almond flour down to a flour consistency, you can sift your almond flour and grind down the larger pieces even more. I have even done this in a mortar and pestle. Does it make for a more flour-like consistency? Absolutely. Is it worth the time? Not in my opinion. If you're trying to impress guests or hide the fact that it's not normal flour, maybe. I find for everything else, having some more mealy type pieces doesn't bother me at all.